Pages

Showing posts with label nail art. Show all posts

Wednesday, April 4, 2012

The Girl On Fire Nails


I’m not sure about everyone else but uh.. Fire is freaking hard to draw. However, I wanted to do my own version of the Girl on Fire nails, so I present to you fire nails for the artistically challenged!
I started with two coats of Sally Hansen Black Heart, then topped it with a coat of Essie Matte About You (which I’m quickly running out of :( ). Once that was dry I took scotch tape and cut tiny triangles out of it to make jagged zigzags/spikes. I put the tape on the back of my hand first so it’s not sticky, then I put it on my nail, painted over it with a coat of China Glaze Riveting, then I peeled the tape off before letting it dry. 
Also, how amazing are black matte nails? And Riveting is friggin’ gorgeous. I’ll do a legit review of it sometime in the future.


Wednesday, March 28, 2012

What do you do when your gradient is a hot mess?

You cover most of it up!


I started with a base of China Glaze Electric Pineapple, then sponged on Sinful Colors Dream On for a gradient effect. I should have done it the other way around, because Dream On is much more opaque than Electric Pineapple. I didn't like how that looked so I topped it with a glitter franken of mine. When I still didn't like it I made scotch tape V's on my nails and did a thick coat of Sally Hansen Black Heart.

Tuesday, March 27, 2012

Stippling Tutorial


First you need to paint your nails with which ever color you like. In my original nails I chose a black base, but I like white much better. Then, using a tiny dotting tool (or a needle, possibly a toothpick, I used a #18/0 spotter brush) make a bunch of dots near the tip of your nail, so many that barely any of the base color shows through. You can use nail polish for this, but I chose to use acrylic paint. After that keep working in sections, using less and less dots and making the sections ever so slightly bigger until you reach your cuticle. If you have long nails you could probably stop before the cuticle, or you could just make the sections bigger. I like to do four sections, but you could do more or less depending on how gradual you want the gradient. 
If there’s any confusion please let me know and I’ll try to clarify!

Wednesday, March 21, 2012

Neon Triangles

What do you need when you're feeling down (besides chocolate)? Bright colors of course! I was stuck on what I wanted to do with my nails, then I saw these and I decided I had to do something like them!


I still need some practice with lines, but I really like how they came out! I started with a base of Julep Hayden (two coats) and then drew the triangles with Sinful Colors Dream On. Dream On dries very quickly, which was both a good and bad thing. Good because moving from one nail to another, I didn't have to worry about smudging, but bad because it was very difficult to get an even coat on my nails, which is why it looks thin in some spots. I finished by outlining the triangles with black acrylic paint.

Despite the minor difficulties I had, I really love these. I love the color combo and I like how each nail is different. :)

Monday, March 19, 2012

Funfetti

Confession: I've never had funfetti cake. Am I missing out on something here? I have had cookies that were made with funfetti cake mix, does that count?
Well anyways, I have some nail art that was intended to just be a fun experiment with dots (my favorite) and layering, but it ended up reminding me of funfetti!


With Essie Matte About You


I started with one coat of Love & Beauty Cream (a very shear white) then did three dots each of OPI Bullish on OPI, Essie Orange, It's Obvious!, Sinful Colors Pull Over, Julep Leah, and Sally Hansen Blue Me Away! on each nail. I followed that with two more coats of Cream, another round of dots, then another two coats of Cream. I kind of wish that I had done more layers of Cream between dots to make the layers really stand out, but I still love this!

Charlie Brown

This part weekend I was helping out with my old middle school's production, You're a Good Man, Charlie Brown. I decided it would be fun to do some Charlie Brown inspired nails for the run of the show :)
If you don't recognize this pattern, then you probably had no childhood.
Go watch Peanuts right now to make up for it.


I decided to keep these simple, mainly because it was late at night and I had school the next day. I used my Wet n Wild nail art brush that I mentioned earlier, and just look that the lines on my middle finger (and ignore the ones on my pinky..)! Seriously, it looks like I used tape on that finger!

The yellow is Sinful Colors Pull Over, which is a really weird consistency right now, so it took about 4 coats and bubbled a lot. The black is acrylic paint.

Nail art brushes that you can find at almost any drugstore!

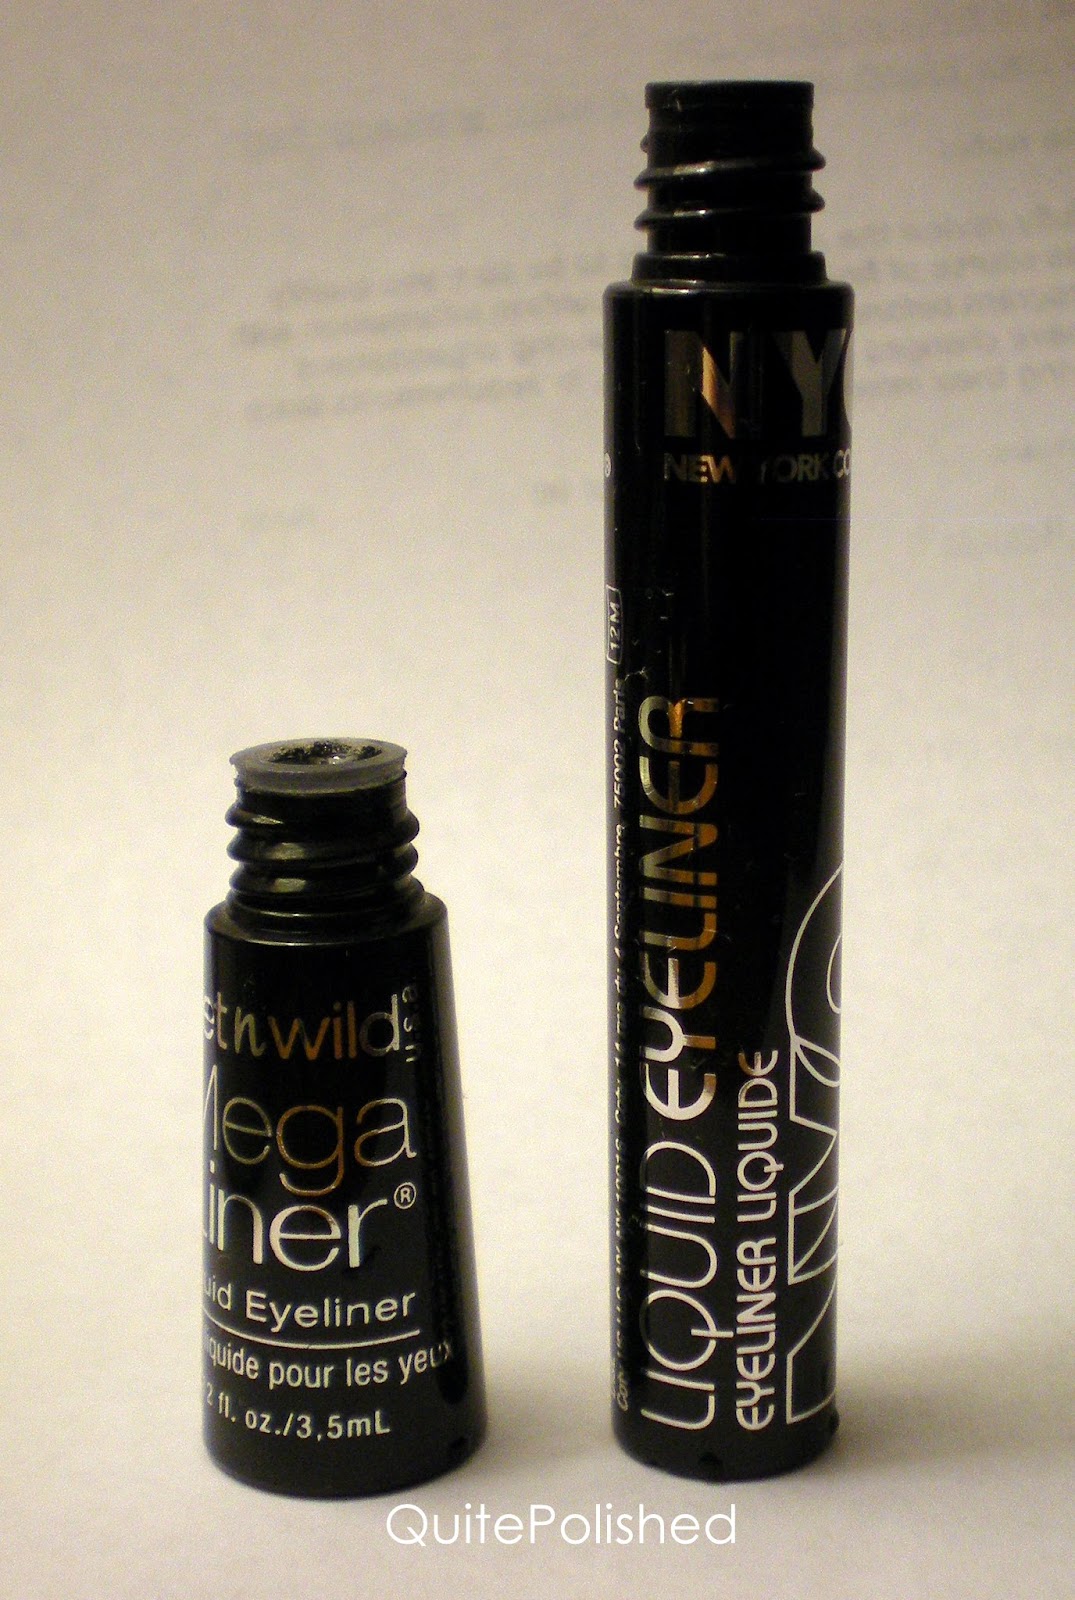
I don't know about everyone else, but I'm a student without a job, which means I have to be cheap when it comes to a lot of things. Despite my addiction, this also applies to nail polish and makeup. I don't have the money to buy expensive eyeliner, so I figure the Wet n Wild and NYC stuff will get the job done. They both do, in case anyone was wondering, I actually really like the Wet n Wild liquid eyeliner.
So what does one do when these run out or become dry?
Get nail art brushes out of the deal of course!


Here we have two very cheap liquid eyeliners. Wet n Wild on the left and NYC on the right. How do you get a nail art brush? Simply clean the eyeliner off of the brushes, which is incredibly easy because neither are waterproof. I have no idea if anyone has already come up with this but I like to think that I'm crafty sometimes.


Here's the Wet n Wild. I prefer this one both as eyeliner and as a nail art brush, because the brush is nicer and the handle allows you to have more control.


Here's the NYC. As you can see the handle is much farther away from the brush, and the brush is not as thin as the Wet n Wild brush.
I have some nail art that I used my Wet n Wild brush for coming up soon!

Friday, March 9, 2012

Peter Pan Collar

Keeping with the black and white theme, I decided to do some Peter Pan Collar nails! I used this tutorial by the beauty department.


I think Peter Pan collars are really cute, but I don't know if I'd be able to pull it off, so for now I'll keep them to my nails.
The black is Sally Hansen Black Heart and the white is acrylic paint.

Stippling Gradient

Sometimes when I'm bored in school I'll just start stippling on the page that I'm taking notes on. I thought it would be fun to do something like that on my nails. I was originally going to do black on white, but I ran out of white nail polish so I had to do white on black. I wish I had done it the way I wanted to, because I think this looks kind of like snow. Oh well, now I know what to do next winter. :)


Also I apologize for the water drops, I had just washed my hands.
I think I may try this again, but with the colors reversed and maybe from cuticle to tip.
The black is Sally Hansen Black Heart and the white is acrylic paint.

Saturday, March 3, 2012

Zigga Zagga Zigga Zagga Oi Oi Oi!

German drinking song? Soccer chant? Theatre chant? Either way, it's fun to say, and I think appropriate for my nail art today; Zig-Zags!
I haven't been feeling my best lately and I've been really uninspired, but yesterday I picked up Orly Ancient Jade on clearance at Ulta and I was so excited about my find that I just had to do some nail art!


First I would just like to say that I am in love with Ancient Jade, it applied great and I just love minty/dusty/pastely/greenish colors. I think a lot of swatches online make this look more blue, but just looking at my nails compared to the above picture, what I took is definitely accurate (the other two pictures aren't as color accurate). I did two coats of Ancient Jade. The black and white are acrylic paints.


I went kind of crazy on my thumb because I drew the zig-zag in the middle before I had decided that I wanted to do them off center. I didn't feel like starting over (because it was 1am and I was out of polish remover) so I just went with it. I found that the best way to match up the zig-zags is is put dots corresponding to where the lines turn (see white dots on thumb) and then connect the dots. When I didn't do this it was a lot harder to match up the lines.


Obviously macro photos show off every flaw, so I figured I should throw in a picture of what it looks like at normal viewing distance. I was originally going to do a tribal print but I really like the off-center zig-zags!

Monday, February 20, 2012

Cupcakes!

Chalkboard Nails is hosting a nail art contest that has to feature a dotting tool of some sort, and I knew I wanted to do something fun for my entry! I've been wanting to do cupcake nails for a while so I figured this would be the   perfect chance to try them! Another rule was that nail art brushes could not be used so everything is done with either the nail polish brush, a toothpick, or a needle.


I have to say, it killed me not being able to use a brush, especially for the outline, but I think it still turned out pretty good with a toothpick! The base colors used, from thumb to pinky: Ulta Mint Condition, Sinful Colors Vacation Time, Sally Hansen Mint Sorbet, Sally Hansen Lacey Lilac, Julep Hayden
Other colors used: Sally Hansen Black heart, Wet n Wild French White Creme, Sinful Colors Pull Over, Sally Hansen Blue Me Away!, Sinful Colors Dream On.

More details on the contest can be found here.

Saturday, February 18, 2012

Bright and Subtle Polka Dots

When I got Ulta Mint Condition I really wanted to water marble with it and I picked out two other colors that I thought would look really good with it. Unfortunately those polishes weren't working for water marbling so I decided to do polka dots instead!


The base is two coats of Mint Condition and the dots are Julep Hayden and Sally Hansen Wet Cement. I love how Hayden is so bright while Wet Cement is a lot more subtle. I love polka dot manis and I have a paintbrush that is great for making tiny dots, and the best part is that this is something I can do with my left hand too!

Thursday, February 16, 2012

Mermaid Nails + A Mini Lesson in Photographing Flakies

Lately I haven't been feeling very inspired when it comes to nail art, but after swatching Sinful Colors Kissy yesterday the colors got me thinking of the mermaid/fish scale nails that I have seen around. I've been meaning to get more practice painting designs on my nails so I thought fish scales would be something fun and easy to do!


Accent nail is two coats of Sinful Colors Rise and Shine topped with one coat of Sinful Colors Kissy. The scales were painted with Rise and Shine. The other nails are two coats of Love and Beauty Nude topped with two coats of Essie Shine of the Times.
This mani is essentially a collaboration of many of the things that I love in nail polish: flakies, glitter, accent nails, nude polish, and teal/green polish. Love.


Something I've learned from photographing Shine of the Times (and I'm sure this applies to other flakies as well), sunlight is necessary if you really want to capture the flakies. It's the difference between this


and this!


Helllooo giant difference. Also, if you're wondering, that's one coat of Essie Shine of the Times over two coats of OPI Russian Navy.

Tuesday, February 14, 2012

Valentine's Day Watercolor

I had a lot of problems deciding what to do with my nails for Valentine's Day. Probably because I own two reds and maybe three pinks. And one purple. So you can see my dilemma. I wasn't really in the mood for in your face hearts, so I decided to go with something softer that could showcase (almost) all of the Valentine's Day Colors that I own on each nail! I got my inspiration from Chalkboard Nails who links to a video tutorial from Beautygeeks.
Zombie hands were necessary to get accurate colors


Obviously mine didn't turn out quite like the tutorial, but I still really like them.
The colors, in the order that I used them:
Wet n Wild French White Creme (base)
SinfulColors Vacation Time
OPI Bullish on OPI
Sally Hansen Lacey Lilac
Petites Pink Candy

Again, necessary zombie hands


These were really fun and easy to do, and they didn't take much time at all!

Sunday, February 12, 2012

Whodunit?

I've been wanting to do finger print nails for a while now, so that is what I did instead of something Valentine's Day themed because I am horrible at ideas for holiday-themed nails.


The base is two coats of Sally Hansen Wet Cement and one coat of Love and Beauty Cream on top in order to make it a bit lighter. The finger prints are done with black and white acrylic paint. To avoid globs of paint of my nails instead of finger prints I took a small paintbrush and painted the paint onto my fingers (I used my thumb and index finger). I then rolled my finger over my nail (kind of like stamping). Cleanup was really easy because acrylic paint washed off with soap and water and a tiny bit of scrubbing, just make sure you put a top coat over the paint on you nails!


Fun Fact: I have actually been finger-printed before. The story behind it isn't really that exciting; I work for my school and this past year the district mandated that everyone employed by the school had to be finger printed. There was no ink involved, they had this scanner thing that they roll all of your fingers over. When I was waiting for them to get the machine ready I had to sit on a bench with handcuffs attached to it, so that was fun.

Thursday, February 9, 2012

Earthy Rainbow

When I first started getting into nail polish, I would generally change my nails once a week. Now I'm up to 4-5 times a week. I know a lot of people will just add on to polish that they already have one, but I haven't up until now. I had on Zoya Yara and decided that I wanted to add something because plain nail polish is just to.. plain.
From left to right: Orly Chocolate Martini, Sinful Colors All About You,
Zoya Yara, Zoya Shawn


I tried sticking to colors that would compliment each other and I didn't realize until after I was done that it looks like a very earth-toned rainbow! This was very quick and easy to do and I used scotch tape to make the stripes. I apologize for the tipwear, this was after only one day of wearing Yara after I wrapped the tips.

Also, I know you can't see it very well but ohmygosh Chocolate Martini is so pretty and I wish that I had more than just a mini bottle of it.