Pages

Showing posts with label sally hansen. Show all posts

Wednesday, April 4, 2012

The Girl On Fire Nails


I’m not sure about everyone else but uh.. Fire is freaking hard to draw. However, I wanted to do my own version of the Girl on Fire nails, so I present to you fire nails for the artistically challenged!
I started with two coats of Sally Hansen Black Heart, then topped it with a coat of Essie Matte About You (which I’m quickly running out of :( ). Once that was dry I took scotch tape and cut tiny triangles out of it to make jagged zigzags/spikes. I put the tape on the back of my hand first so it’s not sticky, then I put it on my nail, painted over it with a coat of China Glaze Riveting, then I peeled the tape off before letting it dry. 
Also, how amazing are black matte nails? And Riveting is friggin’ gorgeous. I’ll do a legit review of it sometime in the future.

Wednesday, March 28, 2012

What do you do when your gradient is a hot mess?

You cover most of it up!


I started with a base of China Glaze Electric Pineapple, then sponged on Sinful Colors Dream On for a gradient effect. I should have done it the other way around, because Dream On is much more opaque than Electric Pineapple. I didn't like how that looked so I topped it with a glitter franken of mine. When I still didn't like it I made scotch tape V's on my nails and did a thick coat of Sally Hansen Black Heart.

Monday, March 19, 2012

Funfetti

Confession: I've never had funfetti cake. Am I missing out on something here? I have had cookies that were made with funfetti cake mix, does that count?
Well anyways, I have some nail art that was intended to just be a fun experiment with dots (my favorite) and layering, but it ended up reminding me of funfetti!


With Essie Matte About You


I started with one coat of Love & Beauty Cream (a very shear white) then did three dots each of OPI Bullish on OPI, Essie Orange, It's Obvious!, Sinful Colors Pull Over, Julep Leah, and Sally Hansen Blue Me Away! on each nail. I followed that with two more coats of Cream, another round of dots, then another two coats of Cream. I kind of wish that I had done more layers of Cream between dots to make the layers really stand out, but I still love this!

Friday, March 9, 2012

Peter Pan Collar

Keeping with the black and white theme, I decided to do some Peter Pan Collar nails! I used this tutorial by the beauty department.


I think Peter Pan collars are really cute, but I don't know if I'd be able to pull it off, so for now I'll keep them to my nails.
The black is Sally Hansen Black Heart and the white is acrylic paint.

Stippling Gradient

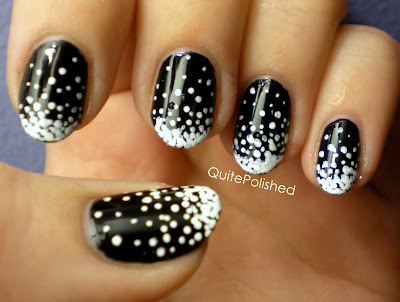
Sometimes when I'm bored in school I'll just start stippling on the page that I'm taking notes on. I thought it would be fun to do something like that on my nails. I was originally going to do black on white, but I ran out of white nail polish so I had to do white on black. I wish I had done it the way I wanted to, because I think this looks kind of like snow. Oh well, now I know what to do next winter. :)


Also I apologize for the water drops, I had just washed my hands.
I think I may try this again, but with the colors reversed and maybe from cuticle to tip.
The black is Sally Hansen Black Heart and the white is acrylic paint.

Monday, February 20, 2012

Cupcakes!

Chalkboard Nails is hosting a nail art contest that has to feature a dotting tool of some sort, and I knew I wanted to do something fun for my entry! I've been wanting to do cupcake nails for a while so I figured this would be the   perfect chance to try them! Another rule was that nail art brushes could not be used so everything is done with either the nail polish brush, a toothpick, or a needle.


I have to say, it killed me not being able to use a brush, especially for the outline, but I think it still turned out pretty good with a toothpick! The base colors used, from thumb to pinky: Ulta Mint Condition, Sinful Colors Vacation Time, Sally Hansen Mint Sorbet, Sally Hansen Lacey Lilac, Julep Hayden
Other colors used: Sally Hansen Black heart, Wet n Wild French White Creme, Sinful Colors Pull Over, Sally Hansen Blue Me Away!, Sinful Colors Dream On.

More details on the contest can be found here.

Tuesday, February 14, 2012

Valentine's Day Watercolor

I had a lot of problems deciding what to do with my nails for Valentine's Day. Probably because I own two reds and maybe three pinks. And one purple. So you can see my dilemma. I wasn't really in the mood for in your face hearts, so I decided to go with something softer that could showcase (almost) all of the Valentine's Day Colors that I own on each nail! I got my inspiration from Chalkboard Nails who links to a video tutorial from Beautygeeks.
Zombie hands were necessary to get accurate colors


Obviously mine didn't turn out quite like the tutorial, but I still really like them.
The colors, in the order that I used them:
Wet n Wild French White Creme (base)
SinfulColors Vacation Time
OPI Bullish on OPI
Sally Hansen Lacey Lilac
Petites Pink Candy

Again, necessary zombie hands


These were really fun and easy to do, and they didn't take much time at all!

Sunday, February 12, 2012

Whodunit?

I've been wanting to do finger print nails for a while now, so that is what I did instead of something Valentine's Day themed because I am horrible at ideas for holiday-themed nails.


The base is two coats of Sally Hansen Wet Cement and one coat of Love and Beauty Cream on top in order to make it a bit lighter. The finger prints are done with black and white acrylic paint. To avoid globs of paint of my nails instead of finger prints I took a small paintbrush and painted the paint onto my fingers (I used my thumb and index finger). I then rolled my finger over my nail (kind of like stamping). Cleanup was really easy because acrylic paint washed off with soap and water and a tiny bit of scrubbing, just make sure you put a top coat over the paint on you nails!


Fun Fact: I have actually been finger-printed before. The story behind it isn't really that exciting; I work for my school and this past year the district mandated that everyone employed by the school had to be finger printed. There was no ink involved, they had this scanner thing that they roll all of your fingers over. When I was waiting for them to get the machine ready I had to sit on a bench with handcuffs attached to it, so that was fun.