Hi everyone! Sorry for not posting lately, I kind of abandoned this blog out of no where. I've just realized that running a tumblr and a "real' blog is too much for me and I'm just gonna stick with Tumblr.
If you want to keep up with my nails you can find me on Tumblr, Facebook, and Pinterest :)
Wednesday, August 29, 2012
Thursday, July 5, 2012
Let's Go to the Beach!

These were done as an entry for Daring Digit’s Beach Day nail art contest. I'm posting these on here kind of after the fact, but I won third place! I never win anything so it made my day when I found out! My ideas for what I would do changed about a hundred times, but I’m pretty happy with how they turned out. :) I think the umbrella nail is kind of awkward color-wise but I really love all of my other nails, especially the starfish! The starfish were really easy too, I just used my favorite tiny paintbrush to make the arms, making sure to start at the middle so the tips would be thinner.
Fun Fact: My boyfriend thought the bikini was a smiley face made out of bananas before he expanded the picture.
Monday, June 18, 2012
Metametics The Rainbow Guard

Metametics The Rainbow Guard
This is two coats of The Rainbow Guard over two coats of Kleancolor Neon Aqua. I’m a huge fan of how rainbow glitter looks over a blue base (surprise surprise). The Rainbow Guard has a hex glitter in all shapes and colors, and it also has bar glitter and silver square glitter. I know there are a plethora of rainbow glitter polishes out there but this one is still very pretty nonetheless, and I like the addition of bar and square glitter (which sadly only made it onto the side of my thumb that you can’t see and my right hand). I didn’t have to do any placement with this and two coats gave me just the right amount of glitter without feeling like I was globbing it on. :)
The Rainbow Guard is also part of a set of polishes inspired by Game of Thrones, which I know absolutely nothing about, but I'm sure others that watch the show would enjoy the polishes! I know I was super excited for Avatar the Last Airbender and My Little Pony polishes because I really love those shows. :)
The Rainbow Guard is not currently for sale but it will be in the future. If you have any questions regarding her polish you can find Metametics on Facebook, Tumblr, and of course Etsy.
This polish was sent to me for review. All opinions expressed in this post are my own.
Wednesday, June 13, 2012
Metametics Airbender
Today I'm showing you Metametics Airbender and I would be lying if I said I kept a completely straight face when opening up the package that had this polish in it. I was like a little kid at Christmas!


This product was provided to me for review. All opinions expressed in this post are my own.

Blue glitter! I’m in love! Airbender is part of a set of four polishes inspired by Avatar the Last Airbender, one polish for each element. I think the timing of receiving this polish was perfect because I just finished watching the series! (Confession, I may have watched all three seasons in less than a week…)
Airbender is a blue based polish with small and medium glitter in both white and blue. My middle and pinky fingers have two thick coats and my thumb and index finger have three thinner coats. At first I thought I may have to dig a bit for glitter, but that turned out not to be the case at all! I also didn’t have to do too much fussing with the glitter to get it placed where I wanted, which is always a plus. :) I wouldn’t really say that the base is a jelly, it’s more like a sheer creme, but you still get the depth of glitter under the layers of polish.
On my ring finger I did the arrow tattoo that the Airbenders have.
How about some bottle shots?


Reviews for The Rainbow Guard and Water Tribe will be coming up soon. :)
Airbender can be purchased here in mini ($4) and full ($10) sizes.
This product was provided to me for review. All opinions expressed in this post are my own.
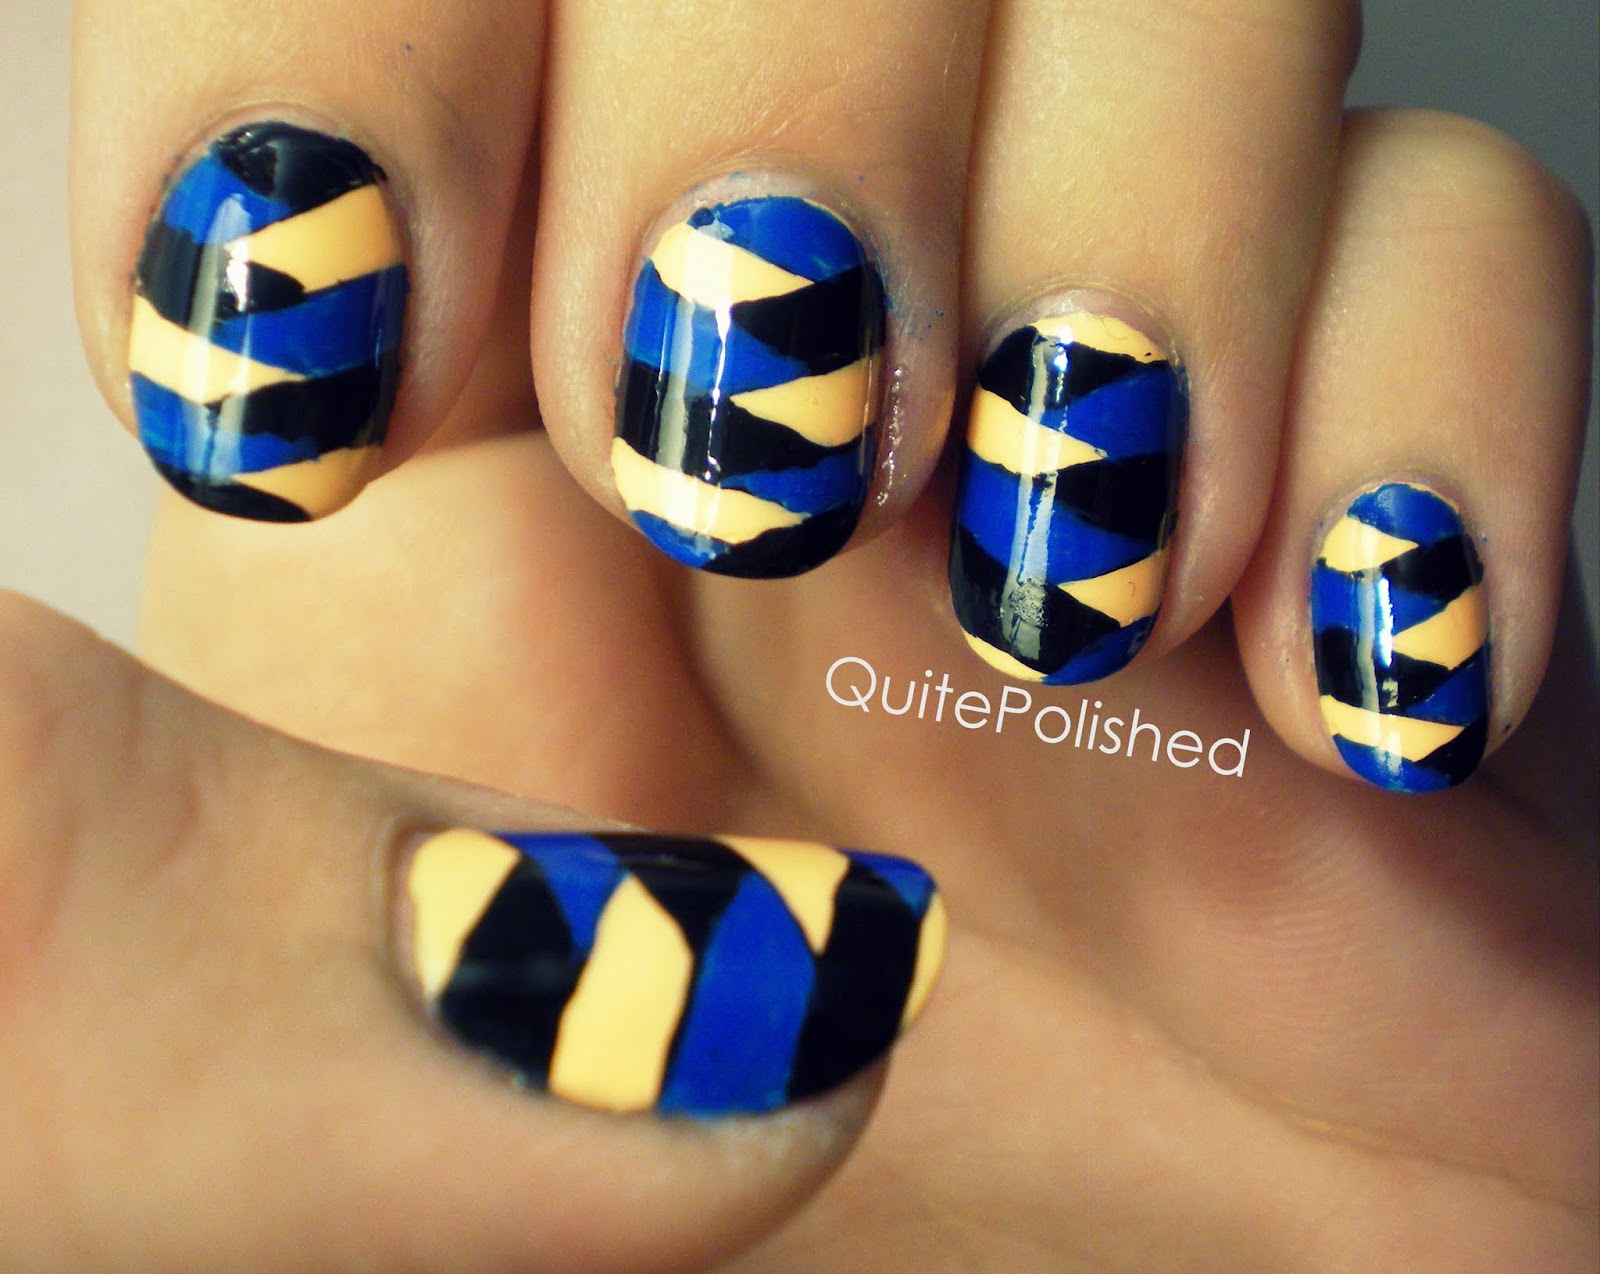
Monday, June 11, 2012
Matte Glitter Gradient

Blue + Glitter = my weakness. I ordered China Glaze Dorothy Who? somewhat on a whim, and I am so glad that I did! It’s a blue jelly filled with blue and silver glitter, and it’s just so pretty! There is one coat on my thumb and ring finger over two coats of Zoya Petra, so I can’t say how many coats it would take before there was no visible nail line, but my guess would be not too many. On my other fingers is a matte glitter gradient with Dorothy Who? and Petra.
Saturday, June 9, 2012
Glitter and Patterns


I've already raved about Pretty and Polished Valentino before, but for whatever reason I haven't used it since I got it! Well.. the reason could be because I only bought a mini and I never want to run out! So I've decided if I'm gonna use my indies I have to at least do some sort of nail art with them!
On my right hand I made stripes using striping tape and on my left I did polka dots! For the polka dots I just used a bobby pin an acrylic paint.
Overall I think that using black and white glitter over a black and white design just gives a really cool look and I really love these. :)
Human Nails
 |
| The Inspiration |

I'm really happy with how these turned out! I like that everything else is faint except for 'human', which is nice and bold. :) For these I used the newspaper technique. What you do is take something with print on it (usually newspaper, hence the name), cut it into smallish pieces, then dip it in alcohol (I use rubbing, but some will just use vodka) then place it on your nail and apply pressure. When you peel it off the ink should have transferred to your nail. Some may say to just dip your nail into the alcohol. I actually find that doing both gets the best results.
A lot of people have asked me how I got the words to not be backwards, and all you have to do is reverse the text before your print it out. :) So if you want to do something like this for yourself make sure you either have an image or you have your text done as word art!
Thursday, May 31, 2012
Water Marbling Success!
I successfully water marbled! Generally when I go to water marble it goes something like “I’m going to water marble and it’s gonna work and it will turn out beautiful like all of the pictures I see and my colors will all look nice and everything will be amazing!” and then two minutes later it’s “Aw screw it water marbling sucks I hate it why did I think this would be a good idea I’m done.”
This time I was determined though! Unfortunately my original color combo didn’t work out even though it was perfect, but after playing around with it for a bit I came up with these three and after that it was super easy (because I just did the same design over and over!).


No idea why my ring finger is green instead of yellow. I get that the blue and yellow mixed but I don't know why on this finger and none of the others. It's not as obvious in the photos but in person it's clearly very green.
So I kinda suck at blogger and I usually just copy whatever I wrote from tumblr on here (sorry, lazy) but for the first time in a long while I'm writing more here! Mainly because I want to talk about things I learned with water marbling (which isn't much) and tumblr isn't the place for a lot of words.
So.
Okay so my original color combo was China Glaze High Hopes, China Glaze Electric Pineapple, and SInful Colors Dream On. In the bottles they all looked really amazing together. It didn't work out, and I'm actually kind of glad because in the bottle Electric Pineapple looks green but came out yellow in water marbling. They all spread at first but as I kept adding drops of polish they just did not want to spread. I figured if I just kept adding it would be fine. Nope. All the colors just mixed together. I figured out that it was Dream On that just blended with the other polishes instead of staying defined from the others. Then I swapped it for Sally Hansen Blue Me Away and that is what you see in the final result! So moral of the story, even if you find a polish that will spread nicely for water marbling, it may just want to mix with other polishes instead. I think it mainly mixed with High Hopes because you can see on my middle finger on the top picture that the line between High Hopes and Blue Me Away isn't as defined - the two started to mix. Thankfully it all turned out well in the end. :)
Friday, May 25, 2012
Flowers and Polka Dots

I don’t know if I’ve mentioned it before, but florals absolutely terrify me. There are many things that I just can’t draw well no matter how hard I try, flowers are one of them. I just.. can’t. So as much as I love how they look, I’ve never attempted them until now. The design is based off of a shirt that I have:

I recently bought Zoya Breezi and have been waiting to try it out so I figured this was the perfect opportunity. All I have to say is that I really really really love this color. I love blue nail polish, especially cremes. Despite this, I am severely lacking in the blue nail polish department so Breezi is a much welcome addition. Great formula and application, as is with the other Zoyas that I own. :)
I was able to purchase Breezi for a penny on a website called Copious because I earned a $10 credit when I signed up through someone's invite link. If you'd like to receive a $10 dollar credit here's my link. Copious sells all types of things such as shoes, clothes, accessories, and beauty supplies. There are a variety of nail polishes to pick from also.
Other colors are China Glaze Electric Pineapple, Sally Hansen Blue Me Away!, Love and Beauty Navy, Essie Navigate Her, and Wet n Wild French White Creme
Monday, May 21, 2012
Gradient Mashup

With all the gradients going around I figured I’d add my own to the mix. They were inspired by this fun drip dye t shirt tutorial. First I did a sponge gradient using China Glaze Go Go Pink and OPI Big Hair…Big Nails over Wet n Wild French White Creme. Then I stippled over that with China Glaze High Hopes. Unfortunately the gradient underneath doesn’t come out too much in the picture, but I still really like they way turned out!
Rainbow Honey Pinkie Promise

This is my second Rainbow Honey polish and it is just as amazing as Siren Song. Pinkie Promise is a part of the Equestria Collection, which was inspired by My Little Pony: Friendship is Magic. The collection includes 6 polishes which represent the 6 main ponies (Pinkie Promise of course corresponding to Pinkie Pie) and two other yet to be revealed polishes. I’m a fan of the show so I was really excited when I learned it was the inspiration for the collection. :)
On to the polish itself… can I just say amazing? Pictured is two coats of Pinkie Promise over three coats of China Glaze Go Go Pink. Application was great, and I didn’t have to “place” the glitter where I wanted it very much, unlike with some glitters. Also there was no “fishing” for any of the larger glitter, every time I dipped the brush into the bottle it came out covered with a nice assortment of glitter. Now, what glitter is in this polish exactly? The polish is described as a “Fun and shimmery pink base filled with hexes and bars in magenta, light blue, and gold” and I would just like to add to that that there are four different sizes of hexes!
Pinkie Pie is unfortunately no longer available for but it will be for sale later in June. Full sized (15ml) bottles are $10 and minis (7ml) are $5.
This polish was sent to me for consideration. All opinions expressed in this post are my own.
Tuesday, May 8, 2012
China Glaze High Hopes
I ordered this color somewhat on a whim, I had found a great amazon store that sold china glaze really cheap with shipping that wasn’t so high that I wasn’t actually saving money. I wanted to order at least two polishes to get the most bang for my buck so I got Riveting and High Hopes. I own very few warm colors, especially in the red/pink department, so this was a great addition to my collection.


High Hopes is a bright pinkish red-orange creme. Or kinda like a really bright color. I’m clearly really good at describing colors. All I know is that it’s really pretty and I’m glad I own it. High Hopes is a part of the 2010 Spring Up and Away collection. Application was okay. This is the third China Glaze creme that I own and I’ve noticed that they all have a thinner formula than other brands that I’ve tried. Shown is two coats but I could have used a third because there is some visible nail line on some of my fingers.
Overall I really love this color, it’s great for spring and summer. It’s also great on toes! I’ve been wearing it on my toes for a few weeks now and it looks great :) China Glaze generally retails for $7 at stores such as Ulta and Sally Beauty Supply.
Also, Matte!!

Beauty Without Cruelty Deepest Mulberry

Hi sorry I suck at posting. And I want to apologize for the sloppy cuticles but I was sick when I did these (still am) so that wasn’t exactly top priority.
Anyways this is Beauty Without Cruelty Deepest Mulberry. As the name suggests it is a deep mulberry creme. Pictured is two coats. Application was so-so. The brush is wide, although not as wide as OPI, and the formula is a bit thin so I found it hard to get a good amount of polish on the brush so I wouldn’t have too much/too little. This is definitely more of a fall color but I still think it’s pretty. It wasn’t my first choice but I got it for free so I’m not complaining! This actually reminds me a bit of Sally Hansen Wholesome Earth which I really liked but ran out of a few months ago.
Beauty Without Cruelty Deepest Mulberry retails for $16.95 and can be found here.
Tuesday, April 24, 2012
Jamberry Spring Flower
So Jamberry is kind like Avon with how they have representatives that sell the products, and we have a representative in my town who worked with my school to give out samples to people who bought post prom tickets, and these were the ones that I chose!


I love birds and florals and both are things that I’m scared of even attempting on my nails so I chose the Spring Flower design, which has both! To put these on you warm them up with a hair dryer for 15 seconds then apply to your nail. Then you file off the excess and use the hair dryer again to seal them. It was pretty easy, although I had some problems getting the tips to stay completely smooth on my index fingers. It’s nothing too horrible though, and these feel very secure on my nails instead of feeling like foreign objects.
Also shown is three coats of Sinful Colors Dream On.
 Labels:
birds,
floral,
pink,
sinful colors
Labels:
birds,
floral,
pink,
sinful colors
Saturday, April 14, 2012
Fishtail Nails
Fishtail nails! For this I sorta used Precious Polish’s tutorial.
Remember that post I did a while ago about making a nail art brush out an old liquid eyeliner brush? So I took that brush and cut off a lot of the bristles to make it really thin, and that’s what I used to do these. It’s nice because this brush is good at making lines but also good at detail work.
Colors: Julep Hayden, blue and black acrylic paint
Also! A picture of me awkwardly modeling my new ring. Ever wonder why my pointer finger sticks out instead of lining up with my middle finger? Yeah, it curves funny. And my pinky is really short apparently, that’s why it tends to look weird in pictures too.

Monday, April 9, 2012
Rainbow Honey Siren Song

Where do I even start? I guess a description from the seller would be good, “This polish is in a shimmery aqua blue base and is loaded with various sizes of hex glitter in gold, aqua and holographic blue, dark blues, dark greens, and a sprinkling of microfine blue bars.” How amazing does that sound? I’d also like to add that some of the gold hex glittters are holographic, and there is also small copperish glitter in there also. Pictured is actually one (thick) coat of Siren Song over one coat or Orly Ancient Jade, which I think makes a perfect base for this polish. I’m sure I could have gotten by with just two coats of Siren Song, but it’s a very chunky polish and I didn’t want huge lumps on my nails. As you can see from the picture this polish is packed with glitter and pigment. Definitely one of a kind, definitely amazing.
Application was pretty good considering all of the glitter. I just painted it on instead of “dabbing” which sometimes has to be done with glitter polishes.
Overall this polish is amazing and Rainbow Honey is amazing, if I had the money I would buy each and every one of her polishes. You can find her on facebook and her store is on etsy. Full sized bottles sell for $10 and minis sell for $4. I’m not sure when she restocks next, and she just came out with a new collections so I’m also not sure if she will still be selling polishes from the Chrono Cross collection (which Siren Song is part of). If you have any questions don’t be afraid to ask trough facebook or etsy, she’s really nice and great about answering questions. :)
 |
| Natural Light |
 |
| Backlit by the sun |
 |
| Direct Sunlight |
Wednesday, April 4, 2012
The Girl On Fire Nails

I’m not sure about everyone else but uh.. Fire is freaking hard to draw. However, I wanted to do my own version of the Girl on Fire nails, so I present to you fire nails for the artistically challenged!
I started with two coats of Sally Hansen Black Heart, then topped it with a coat of Essie Matte About You (which I’m quickly running out of :( ). Once that was dry I took scotch tape and cut tiny triangles out of it to make jagged zigzags/spikes. I put the tape on the back of my hand first so it’s not sticky, then I put it on my nail, painted over it with a coat of China Glaze Riveting, then I peeled the tape off before letting it dry.
Also, how amazing are black matte nails? And Riveting is friggin’ gorgeous. I’ll do a legit review of it sometime in the future.
Labels:
china glaze,
essie,
glitter,
matte,
nail art,
sally hansen
Subscribe to:
Posts (Atom)